Showing posts with label GZG. Show all posts

Monday, June 25

Ground Zero Games Stowage GZG for 15mm SCI-FI

In this video update I provide a detailed view of the full range of stowage in 15mm scale from GZG (Ground Zero Games). In addition to using them as stowage glued to the hull of a 15mm scale scif-fi tank or support vehicle they do have multiple scale uses. The small containers and stowage items are also perfect for basing or terrain materials in 6mm, 15mm and 28mm.  You could also even use these in super small scale like large containers on starships or towed transport for Full Thrust or other starship miniature games. 

So they are very much a nice multi-scale item and worth having a few types of them in the bits box. Here is a video overview.


Tuesday, December 17

Full Thrust New Anglian vs Federal Stats Europa (British Vs French).

I had a fun game of Full Thrust from GZG at the local club on Friday.  I am still amazed at how satisfying it is to play Full Thrust, after many years my old fleet still feels fresh to play and involves some in depth tactical play. Sadly my great tactical ineptitude kicked in and I moved my missile firing vessels in far to closely which, presenting big easy targets for the NAC.  I had the FSE (Federal Stats Europa) fleet with some additional models from Zandris IV and Ninja Magic.  I simply did not have enough in FSE models to be able to match Steve's "New Anglian Confederation" (NAC) fleet so I had to drag out some additional models from my collection.  

For those interested, the game Gruntz was influenced by Full Thrust and the damage tracks and critical process was an inspiration for how I built the damage system in Gruntz. 

On my left flank I sent in a group of four Sub-Munition pack Hydra Class Destroyers which I had stated up as larger ships than the model would normally dictate. This was not really fair on Steve because he thought they were smaller vessels than I was representing with the small models. However I had limited models to use so they were the only thing close to size I could use.  It is worth discussing sizes with your opponent to avoid a surprise when a tiny approaching ship is actually supposed to be a carrier! 

Here is the Hydra class (represented by the small green group of 4 ships on the top left of the above photo).  Image from the http://fullthrust.star-ranger.com/FSEstats.htm web site where I pull most of my stats from for the game.  I drop them into a doc and print them. 

You can see the three submunition packs on the ship design (circle with black filled triangle on top). They are powerful one use only weapons, best used at a range of under 6" for the most devastating close range damage.  After using the one shot submunition packs,  the ships then fall back to using just beam weapons which are the circles with a two Class1 and one Class2 in the front arc only. Class1 beam weapons are the weakest with a range limit of 12". Class2 have 24" range. 


Early game my main FSE fleet splits. The moon and planet models provide a block to line of sight and I decide to split my forces. This is a mistake in the end round or two because I simply can't bring them to bear against the NAC fleet because they are too far from the main battle. 

Zandris IV models in the foreground. GZG FSE fleet (old style) in the background. 


Ninja Magic ships. This model in the foreground was my main flagship for my fleet. You can see the small fighter launch bay along the edge of the ship.  I used the following Littorio Class Battledreadnought statistic card to represent it. You can see the single triangle which represents one flight of onboard fighters which I can launch.  The image in the top centre are two missile launchers and the attached magazine of single use missiles.  The FSE fleet is very missile heavy, tending to be lighter armoured than the British New Anglian Confederation and better at longer range with missile launchers. Something I forgot for this game and got in too close! 


Steve's New Anglian Confed (NAC) fleet. These are from the earlier sculpt range from GZG. 

I used the yellow counters to note when a ship had fired each round. 

You can see my Lego Planet in use next to a sphere. These stone spheres are from a crystal shop on the Isle of Wight. The polished stone looks very moon like and you will find many of these stone orbs available on new age crystal web sites or ebay. These ones only cost me about £3 each and make easy drop on terrain. 

My single fighter group is launched from my main dreadnought. Fighters can move 12" a turn in any direction. 

Close up on my older FSE fleet. 

FSE heavies again. These earlier models from GZG tend to be smaller than the more recent re-sculpts on the GZG site. I must admit the newer ships do look nicer and I need to start investing in some of the new models again. 


Monday, September 17

Sunday Airbrushing

This weekend I have been on hold waiting for the proof read feedback to come through for the draft version of the 1.1 Gruntz rules. Some of it has already come in but I can't start the edits until I have a couple more proofs back or I will miss duplicate typos etc.

So for the first time for about 4 Months I found the time to do some model construction and airbrushing.  I focused on a couple of models that I have had in the queue for a while and got the GZG Mantis unmanned robotic missile attack VTOL put together and the pop up ground emplacement turret from Xmarx. Both of these models play a part in the latest update to Gruntz. The VTOL is part of a new classification of Air Attack Vehicles which is in addition to the standard Air Support Vehicles which are built for troop support and transport. The Air Attack vehicles can carry main weapons which makes them more effective at dealing with vehicle targets.  

The new Xmarx turret also fits into the revised artillery classifications which includes fixed mount weapons and unlimbered field artillery.   The rules allow for the hardened emplacement to pop up by taking 1 action, so they have a higher Soak statistic whilst the emplacement is in closed position which makes them a great base defense.   This was a model I discussed with Xmarx and thought it would be a great feature in a 15mm game.  Xmarx are now also working through the design for a resin bunker which will fit into the Grunts rules. Both of these resin buildings from Xmarx are inspired by strategy computer games which make use of automated turrets and bunkers to support vehicles and other units. 

The VTOL from GZG is a multipart metal kit consisting of a long central bar with fittings like the front cockpit type sections, engine, fins, undercarriage, missile pods and jet thrusters. The various pieces slot on very easily and glue tightly with no pinning needed.  The ball turret style front weapon has two options, a laser/plasma or RAC type.   I already have two of the Roach variant of this VTOL which has a large container beneath to transport troops and I wanted to add this version which has the AI / UAV cockpit section, so rather than glass it has some digital gubbins and sensors added to the front.  

AV-12/U "Mantis UAV" VTOL Gunship unmanned variant (remote or AI-controlled) 


With these VTOL's you can place the undercarriage and wheels in a stowed or down position and I went for the stowed option to represent this model is in flight. One of my exisitng Roach models is on the ground but I wanted to go for an inflight option for this Mantis variant, so it can be seen to be threatening with the missile pods.   With some effort with magnets you could probably create all the variants of the VTOL (Mantis and Roach varients) in a kit form and just click them onto the core structure "rod" which runs like a backbone through the model. Considering the low cost of 15mm and the fiddly nature of magnetising the model it is probably worth just buying the other options and painting them up.

To prep the model I used a sharp scalpel blade and various grades of Tamiya sandpaper. I did not exhaustively track down every mould line and spent most of prep time tidying up the worst of any miscast  sections. It did have some junk in the VTOL blades and exhausts that needed a little TLC to get shifted by using a pin vice to drill out the worst flash.   Overall it was very clean and tidy and easy to put together.  It spent one night in a clear vinegar bath which then stripped any release agent and cleaned off any grease from my hands which tend to get hot when hand sanding and cutting the components.   The fins at the back also needed their slots to be sanded out a bit so they could easily be glued on.

I used the amazing Gorilla Super glue which is thick and contains a resin which makes the join extra tough and avoids the usual superglue crust which can make the join weak.


I used a metal disc base and then glued on the heavy metal "Hex base" from GZG. You can't see the GZG hex base because it is underneath the gel and sand I added to disguise it.  The metal rod is also GZG and comes as part of the large metal flight base.  However on the top I added a Ninja magic magnetic connector. The magnetic connector allows me to pop the VTOL off the base for transport and was strong enough to keep the heavy metal VTOL in place for movement.  I normally use the magnetic connectors on my Full Thrust fleets so I can quickly pack them for transport and change the fleet on the bases.

The Xmarx pop-up ground turret comes as a resin multi-part kit with 3 different turret options. A small missile, large missile and cannon option.  It also has a set of bay doors which slide along rails (which are nicely detailed).  It would be best integrated into a terrain base with extra details but I decided to paint it independently so I can drop it onto any type of terrain.  The doors could also be magnetised to show them open or closed, however I left them lose for ease of airbrushing and you can quickly pop them on as closed bay doors when the model is in use on the table. The detail is really fine.


If you are interested in how I bolt the Ninja Magic Magnetic connectors onto the GZG hex bases you can see a full video showing these components on youtube here:


Primer coat was Tamiya light grey spray primer. This is my go to primer, especially for airbrushing because it has a very fine eggshell type finish, rather than the more powdery matte coat you might get with traditional miniature model primer. This has become a personal preference after years of trying different brands and has worked when I use it on miniatures for painting or airbrushing.  


You can see the roach variant here with the troop transport.


My base colour is a black from Lifecolor. I used the Tire black for the base colour, with a highlight of Vulcanized rubber mixed with a little white to lighten the tone. You can't really see the highlights in the photos but I was intending to aim for a very subtle colour because I wanted a stealth black look to the final model.

With airbrushing you will find that the base coat is ultra smooth.  You don't get lost (as I did) when painting vehicles where you find yourself looking at an inconsistent coat.  It is very hard to finish a large vehicle with a single base coast using a hand brush and the airbrush makes this vital stage much easier.  There is nothing better than having your base colour super smooth and consistent.


You can see here how small these models are with the gas mask in the frame. The Deck Tan colour from Tamiya was used for the base colour of the gun emplacement, with the same Tire black mix from Lifecolor used on the emplacement sliding roof and weapon.  Note to self to make sure you don't leave any Lifecolor paint in the airbrush when adding Tamiya paint. The Tamiya made the Life Color paint curdle and block the airbrush which stopped the flow and required a cleaning break. 

For my airbrushing I use an Awata HPC-Plus airbrush which has a 0.3mm nozzle. They are often used by modellers in the military modelling hobby and can get right down to a very fine and subtle line if you learn to use the fine control.  In this instance I used it with the lifecolor paints which I thinned with a few drops of Vallejo thinners.  The thinners keep the paint flowing well in the airbrush cup, reducing blockages. 

You need a lot of cocktail sticks and cheap pipettes to hand when airbrushing to allow you to easily drop and move thinners, paints and cleaners around. Without pipettes and spare empty pots it becomes a logistics nightmare!


Ready for Airbrushing. Sundstrom mask on and extractor behind me. My airbrush is resting in a desk mount. 

I also use a Sundstrom mask respirator. It has a great filter to keep out the particles of paint and bad stuff.  You can use a lighter mask and goggles but I react badly to acrylic paints and found myself suffering cold like symptons, red face and sore eyes with a standard dust type mask and full goggles. You can always find good quality used Sundstrom masks on Ebay but you might need to purchase a new filter for it.  It got pretty bad so an upgrade to a Sundstrom helped.  My extractor sucks the worst of the paint fumes out of the house but I still reacted badly to the paints before I purchased the respirator. 

Vallejo Thinners.


Iwata HPC-Plus Airbrush.

The next phase for this mini project is weathering and details on both models.  I will try and achieve a stealth look to the VTOL and will weather up the weapons base with scratches and rust water/rust damage. 


Saturday, March 10

Weathering with Artist Pencil

On the last few models I have airbrushed and then weathered I have used some artist silver pencil.  I did try normal HB but it is a little dull and not as bright for the very fine edges.

I know that many in the military scale modelling hobby use them on tank tracks as a final road scuffed edge.  They are great on rusty areas where you might want to show the smallest amount of naked metal along the edge.  On this GZG 15mm sci-fi mobile artillery vehicle I have used it along the edge of the barrel and on the tracks.

You do have to be careful with your spray matt final coat because it can dissolve the pencil lines. You could either add it after the protective matt varnish or simply go easy with the dull layer.  I found if I rub hard on the fine edges it does stick on enough to last through the varnish spray but it does dull it a little.


Monday, July 25

Sanding and Prep

This weekend was a breakthrough in regard to my miniature prep and painting.  With so many Months lost while developing and creating Gruntz which is when I found it difficult to assign time to actual painting of new models because I always felt I should be pushing myself to get more work done on the rules or terrain for shows.


So I managed around 7 solid hours of miniature prep work over the weekend. I have a mix of vehicles and troops from Critical Mass Games, GZG, Khurasan and Peter Pig. The Peter Pig items are a couple of small WWII tanks which I have modified to look like early tech colonist or Guln (see rules for background) Vehicles.   The WWII "Riveted" style tanks will be combined with some of the GZG Alien Mercenary models to give them a grungy feel but I added some chunky turrets and bolt on technical items from my bits box to make them look ready for a SCI-FI battlefield.


The GZG vehicles were also treated to some modification with a flamer conversion and plasma conversion on the recent wheeled APC/Light Tank models.  I am really pleased with these because the contents of my bits box delivered some nice add on pieces which look right on the GZG models.


I burnt through 4 emery boards filing down and smoothing and now have red raw fingers from the experience. Great to be able to get some time to focus on the miniatures again but soon have to get back into writing the v1.1 update for the hard copy of Gruntz which will be out in early August.


I will be back at the hobby table tonight and will snap some photos of the various projects which will be featured in a video guide to building starter armies for Gruntz.

Wednesday, June 15

Rottenlead 5 Vlog Update

Latest Rottenlead episode5 video is uploaded.

In this episode: http://www.youtube.com/user/trybeinganihilist?feature=mhee#p/u/0/v6PMNwOJwYs

Updated progress on GZG Prawn Mecha
Quick look at the finished GZG NAC Specialist unit (Another video of the full painting process to follow soon).
New Pre-release items on show from Critical Mass Games (15mm SCI-FI)
Saving money by converting Games Workshop Chaos Hounds to Flesh Hounds with green stuff.
Showing off my new HPC airbrush.
A look at the Tamiya Weathering powders and a quick look at using them on a vehicle.

Tonight we are recording another episode and will be starting a "How to build a Gruntz' army in 15mm.

Very rough main camera on this weeks episode because we were experimenting by using the HD camera on the miniatures rather than on our faces.


Wednesday, April 20

Salute Gruntz Video

Footage of our game, GZG new releases and CMG new releases in 15mm. Also a couple of shots of the Exodus Wars 6mm SCI-FI models.


Ray at the table during setup.

Tuesday, January 4

Hammerhead Participation Game

I am back on the road this year with the Gruntz participation game. The first show this year is Hammerhead near Newark on February 13th.

If you are in the area, pop over for a chat and join the game if you can.  I will be near the GZG stand. Participating players will be given some freebie goodies in the form of 15mm miniature packs.

Both GZG and Critical Mass Games are at the show, so plenty of 15mm shopping to be done!

The Date,
Sunday February 13th 2011.
The Venue,
Kelham Hall, Kelham, Newark, Nottinghamshire, NG23 5QX

Details here: http://www.hammerhead.org.uk/hammerhead2011.html

Sunday, October 25

GZG 6mm Dirtside figures

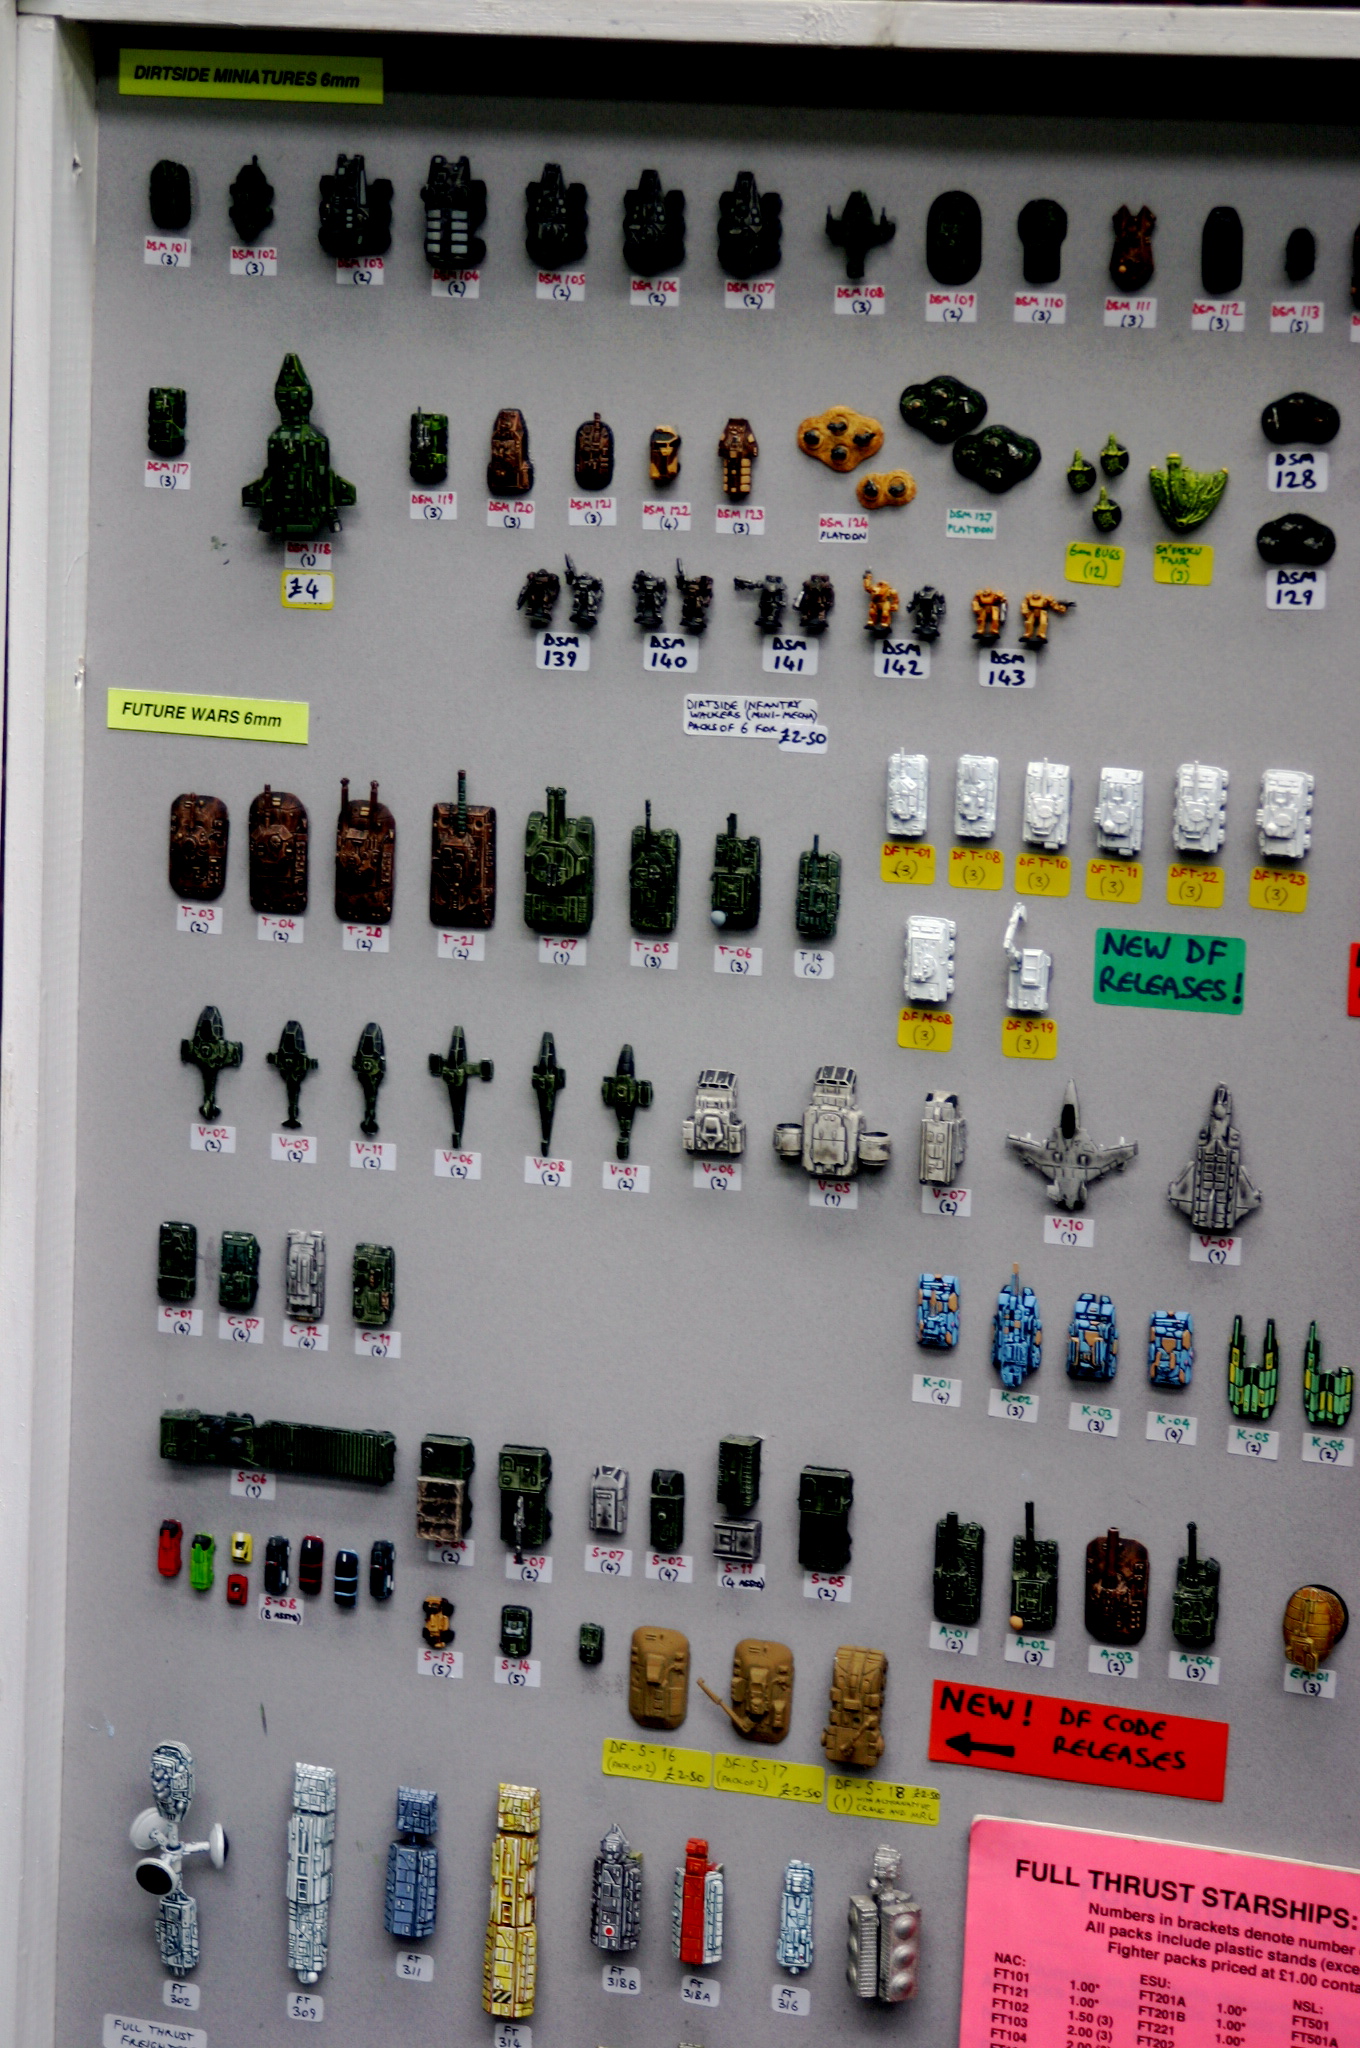
For those interested in 6mm from GZG here is a very large photo of the range with codes. It is a couple of years out of date, however most of the range are visible. Click to see the large image.